Thursday, September 6, 2012

My "matrix roloaded" at the university

  Since the end of my technical college in Poland and before the start of my first course at Lancaster University I'd had a really long, over a decade break from programming. During that time I wrote only a few programs in AMOS Basic and that was pretty much all I did during that time. Luckily, I ended up in Blackpool and some time later someone told me about programming courses at the local college. Few days later I went to Blackpool and the Fylde College and asked about available programming courses. The only course that comprised modules in programming was Game Design & Development. It wasn't exactly what I had in mind but I signed up and after some time it turned out to be the best choice I could've possibly made. Even better, the degrees were awarded by Lancaster University which is one of the best in the UK and also in the top 100 world's best universities. I started this course in 2007, and what you'll read here happened during the very first semester.
  Because it was also a game design course the first part of it was dedicated to various design related topics, like 2D graphics, game level design, basic web design or more technical subject dealing with architecture of game consoles. I remember one of our first group tasks, a concept for a simulation game which we simply called "Aquarium". We brainstormed, wrote down ideas and designed characters and other graphics. First attempt resulted in initial design of game characters and a mock-up level:

"Aquarium" - level elements
"Aquarium" - game characters
"Aquarium" - example level mock-up
"Aquarium" - example level mock-up with characters
  Next, we sat down again and more experienced guys designed new characters in Adobe Flash and thus we came up with a beautiful animation, and eventually with a slideshow which we used to present our game to the rest of the class.
"Aquarium" - game characters, new design
"Aquarium" - background, new design
"Aquarium" - Flash animation, mock-up of the game
"Aquarium" - slideshow outlining the game concept
  One of my early exercises on this course was a game concept which was meant to be presented to the rest of the team in a company, or in our case to the other students. We did this in small groups, and my group came up with this simulation game called "Virtual Sailor". All we needed to design was a simple slideshow briefly explaining what the game is about and outlining its objectives.

Game concept for "Virtual Sailor"
  "2D Platforming Game" (sorry, it had no name) was an example of a more detailed design. I've designed 10 unique elements (tiles) from which I then built a level. Next, I defined the solid area of the level, which would be the area that couldn't be passed through by all characters. Then there was some simple game mechanics and calculation of the solid area of the level. Mechanics is crucial in pretty much every game, as is defines how all characters respond to different actions. Without it your game would be not much more than a static image. I'm not quite sure why I was meant to calculate the solid are of the designed level, but I guess our teacher wanted to see how we apply our geometry and algebra, and how good they are. Let's look at some selected bits of my design document.


  Example level design and game characters will appear in the next example, "Man vs. Robots". Having built a level I could determine the solid are by simply painting over the platforms in another layer of an image.


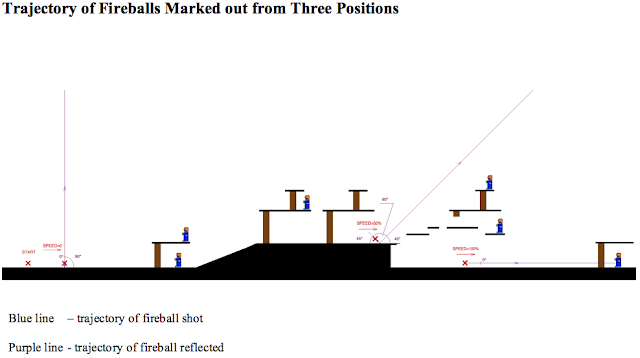
  Next, according to specifications, I drew the trajectory of fireball that the character would shoot...


  ...and calculated and drew trajectories of fireball that the character would shoot moving at different speeds.

  The angle fireballs are projected from the character depends on its speed. This is described by the formula below:

α = 90° - (90° * speed) ; speed = 0 ÷ 100%


  Examples:

speed = 0 ; α = 90° - (90° * 0) = 90°

speed = 50% ; α = 90° - (90° * 0.5) = 45°

speed = 100% ; α = 90° - (90° * 1) = 0°


  Finally, calculation of the solid area of the level:

Size of the level:
Width = 2560 pixels
Height =  768 pixels

Area of the whole level:
2560 * 768 = 1,966,080


The solid area:
Ground: 57 * 2560 = 145,920
Hill: 100 * 290 = 29,000
Slope: 0.5 * 100 * 256 = 12,800
Platforms: 7 * (3*200 + 2*170 + 120 + 5*90 + 50) = 10,920

Altogether: 145,920 + 29,000 + 12,800 + 10,920 = 198,640

Not solid area:
1,966,080 – 198,640 = 1,767,440

Proportion of the solid area:
(198,640 / 1,966,080) * 100% = 10.1%


"2D Platforming Game" - proportion of the solid area of the level

  I reused some of these images in another simple design that I called "Man vs. Robots". This time I was meant not only to outline the game storyline, but also describe game characters and items and how they interact, define game controls, and determine marketing strategies. After all every game needs to be sold, and the more it sells the better. Anyway, let's have a look at the adventures of little Bob who tries to find his way back home on planet Earth. Very simple screens:

"Man vs. Robots" - title screen
"Man vs. Robots" - storyline screen
"Man vs. Robots" - help screen
"Man vs. Robots" -  level 1
"Man vs. Robots" - game characters

"Man vs. Robots" - in-game items
  This was basic preparation for game level design. Some general architecture of most popular game consoles, networking technologies and how game systems evolved over decades were also studied, and that helped better understand certain programming issues that I came across later on. Stay tuned, there'll be little more design in the next post.

Thursday, August 16, 2012

My Amiga Development


  This post will be dedicated entirely to my programs that I've written for Amiga. I don't have any screenshots at the moment therefore you'll only see this short paragraph for now, but as soon as I find some images I'm going to publish them here. I might be able to reconstruct some screenshots from bits of graphics which I used in my old programs, I would do that in a graphic editor. I'll try to run all other programs in an emulator. I don't know any exact dates of creation of those programs, because system clock in my first Amiga was always broken and the dates saved along with files are all incorrect, but I'll at least try to give some approximations. Stay tuned to see my early creations!

Saturday, July 21, 2012

Robot R-29. Inspiration for years to come.

  As I said earlier, when I started to learn programming I often simply typed in example programs from magazines that were easily available at that time. My parents used to buy me those and "Moje Atari" (My Atari) was one of them. Especially, one program had caught my attention and stuck in my mind for several years. I got back to it many times and ported it onto different platforms. Int the Atari magazine it was written in Atari basic for the little Atari. When I switched to Amiga I wrote two versions of it, one was almost identical with the original and the other one was more sophisticated remake that I made to please my little sister. Then, some decade later, I wrote it again in C# XNA on a Windows machine as one of my assignments on foundation degree.

Cover and the page with code for "Robot R-29" in "Moje Atari" magazin (1991)
The original "Robot R-29"
  Last summer (2011) I visited my parents and tried to transfer my Amiga projects onto MS-DOS floppy disks so that I could run them in an emulator later on. I managed to recover quite a lot, but unfortunately pictures I drew for Amiga adaptation of Robot R-29 didn't survive the ageing effect of time and I encountered several errors on that diskette. Although I have the complete AMOS Basic code for that game, it wouldn't be the same even if I tried to reconstruct the sprites and other pictures. I've found some utility software that allows to read erroneous files, though, and next time I'm in my old place I'll try to restore those files again. Hopefully it'll work.

UPDATE 1:
  During my visit at parents' place in the summer of 2013, I successfully ran the Amiga version of my Robot R-29. I ran out of time to copy the files and run the whole game in an emulator, but at least I took photographs of it. I think I tried to use different colours when I drew all images, but I had only a rough idea how they might actually appear. Until now I have only amber monitor plugged into my Amiga and I haven't changed it in ages, but at least I could see my great product again, and that made me very happy. As soon as I get a chance (hopefully during my next visit) I'll make copies of all files, and if I manage to run it an emulator it'll be the first time ever I'll see this game in colour. I wonder what it'll look like.

UPDATE 2:
 My recent visit in parents' place in the summer 2014 was quite successful. I made a null-modem cable and managed to copy lots of file from my good old Amiga over to my Dad's PC. I then ran it in an emulator and even managed to extract the source code which I'll post in another article together with all graphics and 4 additional levels I've found by looking at the source code. Those levels were created at the same time the game was written. Sadly, all images turned out to be black & white. I'm going to color them at some point and post that update, too. All in another post. Now, enjoy proper screenshots and compare them with the photographs I took last year.

Title screen (photograph).
Title screen (screenshot).
Level 2 (photograph).
Level 2 (screenshot).
And this is level 5, the last one in the original project (photograph).
Level 5 (screenshot).

Game over screen (photograph). 
Game over screen (screenshot).
Congratulations screen (photograph).
Congratulations screen (screenshot).

  The last version is my favourite so far. Initially, this was a university project, and except for visuals and maybe sound the game itself didn't differ much from the original Atari game. I wrote this adaptation in XNA C# which was requirement, and actually the first modern programming language I learnt. Some time later, after the project was submitted to my tutor, I spent lots of time adding different features, title screen, high score table, and new items in the game itself (for example keys didn't exist in the original game). I did that just for my own pleasure, because I enjoyed making this game so much.

XNA C# adaptation on Windows XP

  And now I'm looking forward to porting Robot R-29 onto the Mac and iPhone/iPad.

Tuesday, January 31, 2012

Programming on Amiga

  Programming on Amiga was just another great experience. I really enjoyed various demos that were so popular at those times (occasionally I also played games), some things were truly impressive. But I couldn't wait to try start programming on my own. It was obvious to me that since the computer was so capable it must be a great thing to write programs for it. The only problem in the beginning was lack of literature, I had the software I needed, because AmigaBasic came on one of the system disks and was complemented with some examples. First thing that caught my eye was the editor that worked in windowed mode and which was another huge leap in comparison to the little Atari.


  Another superb feature in AmigaBasic was its multitasking that it has inherited from the Amiga workbench itself. The same program could run in few windows simultaneously with other programs that were running on your computer.


  If you're interested in programming in this language follow the link below to download a manual:


  Great! - you say. Yeah. It was great, indeed, but speed wasn't the strongest point of AmigaBasic as it was simply an interpreter. But everyone got it bundled with their computer and operating system and if one had wanted to try programming that would've been the first language to try out.
  Fortunately, there was a better solution. Lots of different software was circulating amongst many friends and soon I became an owner of a copy of AMOS Basic. Although it didn't support the standard Amiga Workbench window system it was far more extended in comparison to AmigaBasic, and yet it was lot faster. Several people wrote many simple games in AMOS Basic in the 90s, and  communities which use it do exist even nowadays, like AMOS Factory, where you can find manuals, download software, or join a forum to get even more quotes. This website also links to other AMOS related website. I looked at it only briefly, but it looks like a very rich resource:


On Amiga Coding website you can look at and download other people's AMOS projects, download books, manuals, magazines (there's only one at the moment, though), access other references (some links might be dead) or read about history of the language or even news! Apart from that, there are also materials about different implementations of Basic (AmigaBASIC, BlitzBasic) and other languages, including C and Motorola 680x0 assembly language that I always would've loved to try.


  Let's look at some examples of clever creations in AMOS Basic. There are several screenshots on that website therefore I chose only those that I find most interesting. People have written games of nearly professional quality (for what AMOS and 16-bit Amiga have to offer):

Battle Space
Code Name Nano
DarkAngel
Prototype
Teeny Weenys
  Some utility programs also look quite good for software written in an interpreter language with limited resources:

Art School
GRAC 2 (Graphic Adventure Creator)
IFF Vector Ball Designer
Magic Paint Box
  Even quite a few disk magazines were written in AMOS Basic, MiggyByte was one of them:

MiggyByte diskmag
  Most people believe that demos on Amiga can be written only in assembly language. Well, this site largely disproves it. You can look at the videos that are linked to, or just see a few screenshots of Megademo 1 written by Daniel Bryde in 1995. It features even some 3D vector graphics.


  If you like AMOS Basic there's a link for you where you can download various development tools: AMOS The Creator, AMOS 3D, Easy AMOS, AMOS Professional, or if you need more speed in your programs there's also a compiler for you. Check this out:


  And get even more AMOS software here:


  Even the AMOS interpreter alone was much faster than AmigaBasic and to make things even faster AMOS offered a complied sprite scripting language called AMAL (AMOS Animation Language) which ran independently of the main program written in AMOS Basic. The language included several commands which allowed to use graphics and sound with a minimum effort in order to achieve quite interesting effects. The editor was also more advanced in comparison to AmigaBasic:

AMOS The Creator
AMOS Professional Version 2.0
Easy AMOS

  I got a chance to develop only in the regular AMOS Basic (AMOS The Creator) and as soon as I manage to recover some of my programs and get screenshots of them I'm going to post them here. I remember that I've built an electronic piano keyboard (all from logic gates and counters) and written a controller for it in AMOS. If I had had an opportunity to compile that program then the boosted speed would've let me add lot more functionality to it. The program was sending clock signals to a counter and them multiplexer selected one of the keys to read input from, and which then was sent back to the computer. Interpreter allowed to do that only with certain speed and didn't leave much time for any other tasks, like playing sound and controlling its envelope in real time.
  I wrote most of my programs in AMOS Basic in early 90s and then came back to it for a short time about a decade later. AmigaBasic was my programming language for only about two years, before I got a copy of AMOS and switched to this language for good.